Creating an AWS Read-Only IAM User for Coordimap
Create an AWS IAM read-only user and access keys for the Coordimap agent to discover cloud resources without write permissions.
To securely connect the Coordimap agent to your AWS account, as outlined in the AWS Configuration guide, it is best to use an IAM user with the minimum required permissions. This guide walks you through creating a dedicated AWS read-only user.
Using a read-only user ensures that the Coordimap agent can only discover your AWS resources (like EC2 instances, VPCs, Load Balancers) for diagramming purposes and cannot make any changes to your environment. This is a critical security best practice.
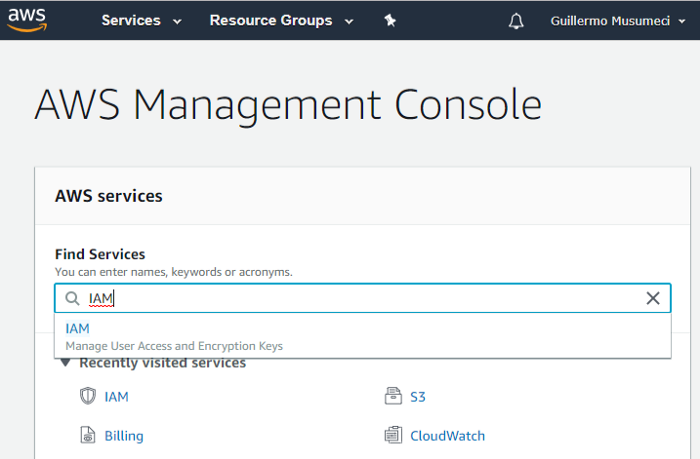
Step 1: Navigate to IAM in AWS Console
- Log in to your AWS Management Console.
- In the top search bar, type
IAMand select the IAM service (Identity and Access Management).
Step 2: Add a New IAM User
- In the IAM dashboard, click on Users in the left-hand sidebar menu.
- Click the Create user button (or "Add users" depending on your console view).
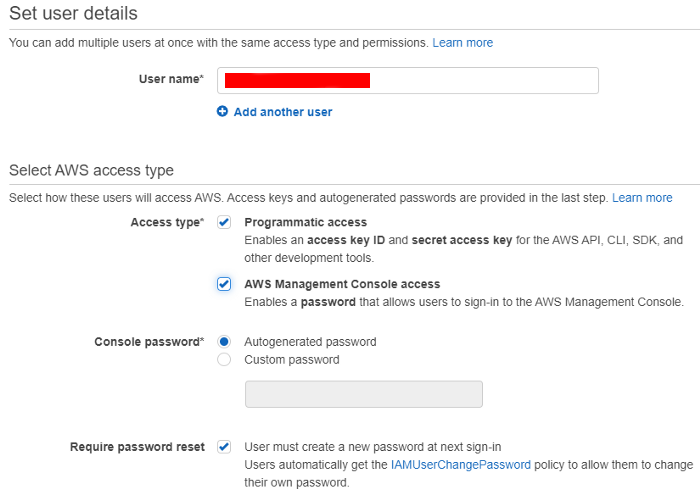
Step 3: Specify User Details and Access Type
- User name: Enter a descriptive name for the user (e.g.,
coordimap-readonly-agent). - AWS credential type: Select Access key - Programmatic access. This is crucial because the Coordimap agent needs API keys (Access Key ID and Secret Access Key) to interact with AWS services programmatically.
- Console access (Optional but Recommended to Disable): It's generally best practice for service accounts like this not to have console access. Ensure Password - AWS Management Console access is deselected.
- Click Next: Permissions.
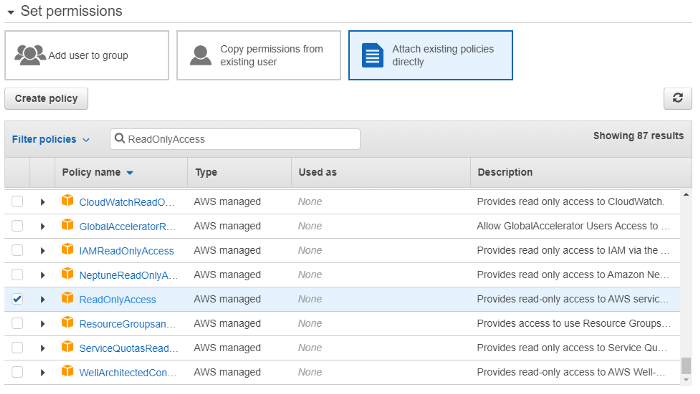
Step 4: Attach Read-Only Permissions
- Select the option Attach existing policies directly.
- In the filter policies search box, type
ReadOnlyAccess. - Find the AWS managed policy named ReadOnlyAccess and check the box next to it. This policy grants permissions to view resources across most AWS services without allowing any modifications.
- Click Next: Tags.
Step 5: Add Tags (Optional)
You can add tags (key-value pairs) to help organize and identify your IAM users. This step is optional. Click Next: Review.
Step 6: Review and Create User
- Carefully review the user details and the attached
ReadOnlyAccesspolicy. - Ensure Programmatic access is enabled and Console access is disabled (recommended).
- Click Create user.

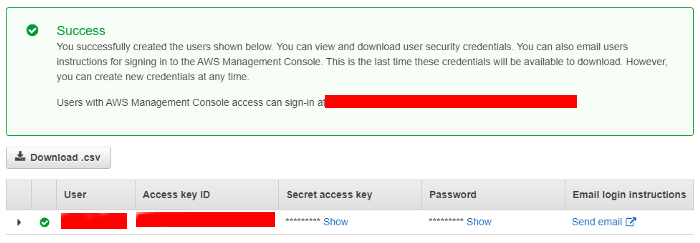
Step 7: Download and Secure Credentials
- Crucial Step: On the success screen, you will see the Access key ID and the Secret access key. The Secret access key is shown only once.
- Click the Download .csv button to save a file containing both keys.
- Store these credentials securely! Treat the Secret Access Key like a password. You cannot retrieve it again from the AWS console after leaving this screen. If lost, you'll need to create a new access key.
Secure Your Credentials
The Access Key ID and Secret Access Key grant access to your AWS account.
Store the downloaded .csv file securely and restrict access to it. Consider
using a secrets management system.
Next Step: Connect AWS to Coordimap
With your read-only IAM credentials ready, continue to the AWS Configuration guide to add your data source and start mapping your infrastructure.
Map Your AWS Infrastructure with Read-Only Access
Configuring An AWS Data Source For Coordimap
Configure Coordimap AWS data sources with the correct scope_id, IAM credentials, crawl intervals, and optional VPC Flow Logs.
Google Cloud Platform Flow Logs
Enable Google Cloud VPC Flow Logs in the Console or Terraform so Coordimap can visualize service-to-service network traffic and attach flows to the correct scope_id.